

how long to let engine cool before changing spark plugs
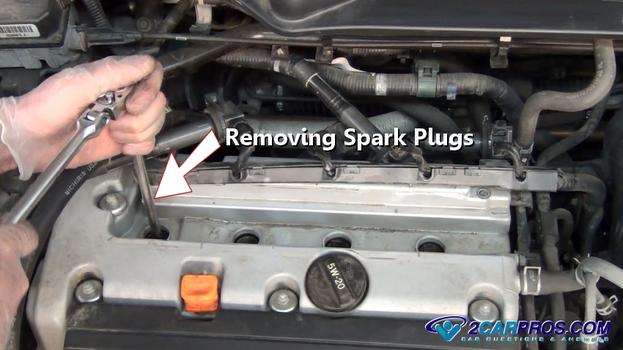
Step 1 - Some engine's are designed with a plastic encompass over the ignition coils and spark plugs. Spark Plug Encompass Step 2 - Employ a socket or wrench to remove the nuts belongings down the comprehend. Removing Spark Plug Encompass Nuts Step 3 - After all mounting nuts accept been removed, gently remove the cover. SPONSORED LINKS Remove Spark Plug Comprehend Step 4 - On COP (whorl over plug) ignition arrangement designs the spark plugs are located beneath the ignition coils. Ignition Coils Step 5 - Once the ignition coils have been uncovered, remove the curlicue mounting bolts. (Note: curl wiring may demand disconnecting prior to this step.) Remove Ignition Ringlet Mounting Bolts Footstep 6 - Next, remove the ignition coils from the spark plug wells and place them off to the side. (Note: Inspect ignition coil for corrosion or signs of arcing.) Removing Ignition Coils Step 7 - After the coils have been removed, use a spark plug socket to remove the spark plugs, this socket is specially designed to hold and protect the spark plug from damage. Spark Plug Socket Step 8 - Use a ratchet and extension to remove the spark plugs, ensure the socket is completely on the spark plug earlier removal to avoid harm. SPONSORED LINKS Removing Park Plugs Pace 9 - One time the spark plug has been removed, inspect the plug for impairment and wear. Worn Spark Plug Step 10 - Compare the new spark plugs to the old units to ensure a proper installation. In nearly cases spark plugs do not need to exist re-gaped as they are manufactured to the right measurement for each application. New Spark Plug Step 11 - Before installing the new spark plugs, apply a sparse layer of lubricant (anti-seize) to avoid thread galling (stripping). Apply Lubricant to Spark Plug Threads Stride 12 - Insert the spark plug into the socket while ensuring a snug fit, (the spark plug shouldn't autumn out of the socket on its ain). Installation Ready Spark Plug Step 13 - Gently lower the spark plug down into the plug well (do not drop plug), continue installing the spark plug while threading by hand. SPONSORED LINKS Lower Plug Into Well Step 14 - In one case the spark plug have been installed past hand, utilize a ratchet to tighten to manufacturers specifications (snug, practise not over tighten). Tighten Spark Plugs Step 15 - Side by side, reposition the ignition coils for re-installation. Reinstalling Ignition Coils Footstep 16 - Afterwards installing the ignition coils, reinsert the mounting bolts and tighten. Tighten Ignition Gyre Bolts Step 17 - Once all coil mounting bolts are tight, reinstall the ignition cover dorsum into place. Reinstall Spark Plug Embrace Step 18 - Install all mounting bolts and tighten, double check all steps to ensure a correct completion. Tighten Ignition Coil Spark Plug Cover Stride 19 - When replacing spark plugs always check the plug condition, this inspection can observe bug inside the engine such as rich mixture, depression pinch or failed injector. SPONSORED LINKS Carbon Fouled Step 20 - When a spark plug is moisture with oil at that place is a problem with the piston rings or valve stem seals, additional issues include plugged oil drain back holes in the cylinder head. Wet Spark Plug Footstep 21 - Before installing a new spark plug inspect the air gap in case the plug was damaged during shipping. Misadjusted Air Gap Step 22 - Visually inspect the air gap and adjust to manufacturers specifications. Right Air Gap Pace 23 - A spark plug is constructed of a metal housing and a porcelain insulator which is very brittle and if broken or cracked volition misfire then employ care when treatment. Spark Plug Helpful Information Subsequently replacing spark plugs the engine could stall, idle loftier or depression, this is normal as the computer is re-learning the resistance of the ignition system which effects ignition timing. Some engine's are designed using spark plug wires which are hands removed (twist the boot to loosen seal) before removing wires. If the engine is running rich all of the spark plugs volition have a black or grey soot covering the spark plug electrode and if lean all of the spark plugs will be clean and white. If one spark plug electrode appears different than the remaining spark plugs, that cylinder is having a problem. The within of a spark plug socket is lined with a rubber cushion to safe support the spark plug insulator. Most engine'southward are designed with a COS arrangement (coil over spark plug) which has no plug wires simply ignition coils, other systems include HEI (loftier energy ignition) which utilizes a benefactor and spark plug wires. If spark plug threads are damaged use a thread cleaner or tap loaded with grease to catch the metal chips that would usually go into the combustion bedroom, also use a can of compressed air with the long plastic extension inserted downward into the cylinder to blow out excess particles helping the removal of additional particles. Tools and Supplies Needed Best Practice SPONSORED LINKS Article published 2021-09-29 


Source: https://www.2carpros.com/articles/how-to-change-spark-plugs
Posted by: reynoldslefor1982.blogspot.com
0 Response to "how long to let engine cool before changing spark plugs"
Post a Comment